Korker Fun

Korker ribbon is a fun project for a weekend afternoon! True it is time consuming, but it is also very rewarding! With just a little patience and a lot of ribbon you can make quite a mound of korkers! It is like Christmas when I open my oven and see all those wonderful Korker Ribbons!
I know one thing for sure, I am going to invest in a wood burning tool. Using the cigarette lighter to seal the edges begins to hurt my thumb after a while and with the wood burning tool you can cut and seal all at the same time!
 To make korker ribbons you will need
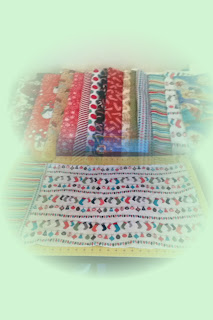
ribbon ( I use 1/8 or 3/8 but you can use any size you choose)
wooden dowels ( I use quarter inch, but play around and choose your size)
clothespins
baking pan
oven,
timer,
scissors or rotary cutter.
something to seal the edges (lighter, woodburning tool, or seam sealant).
Begin by setting your oven to 275. I use an oven thermometer just to double check my temp. Begin wrapping the ribbon onto a quarter inch dowel. I used 3/8 ribbon. I try to keep it straight, with no spaces and tight. Secure the ends with the clothespins.

Place the ribbon wrapped dowels in a baking pan (I line mine with foil but this is just my preference) and place in preheated oven for 25 minutes. Be sure to set a timer, you don't want to forget about them ( I am speaking from experience here).

After 25 minutes take them out of the oven and allow to cool. The magic is about to happen!

After they have cooled, about 5 minutes, take the clothespins off and loosen the ribbon on the dowel. The ribbon then will slide off in one long curly piece! Wow, this is the part that reminds me of Christmas. I find it exciting every time ( I know, it is possible I need to get a life!)


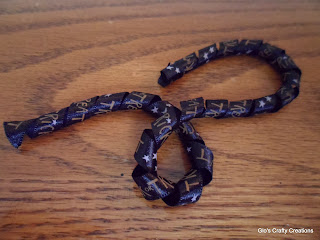
I trim up both ends of the ribbon where they were secured by the clothespins and then cut each ribbon 2 1/2 or 3 inches long. I cut at an angle, but if you are going to seal the ends it doesn't really matter how you cut them. You can play around with this, you may like them shorter or longer. It is all up to you. I seal each end with a lighter so they do not fray.
There you have it, a mound of Korkers! It is such fun!


Now I am ready for some Korker Bow Fun!

I know one thing for sure, I am going to invest in a wood burning tool. Using the cigarette lighter to seal the edges begins to hurt my thumb after a while and with the wood burning tool you can cut and seal all at the same time!
ribbon ( I use 1/8 or 3/8 but you can use any size you choose)
wooden dowels ( I use quarter inch, but play around and choose your size)
clothespins
baking pan
oven,
timer,
scissors or rotary cutter.
something to seal the edges (lighter, woodburning tool, or seam sealant).
Begin by setting your oven to 275. I use an oven thermometer just to double check my temp. Begin wrapping the ribbon onto a quarter inch dowel. I used 3/8 ribbon. I try to keep it straight, with no spaces and tight. Secure the ends with the clothespins.

Place the ribbon wrapped dowels in a baking pan (I line mine with foil but this is just my preference) and place in preheated oven for 25 minutes. Be sure to set a timer, you don't want to forget about them ( I am speaking from experience here).


I trim up both ends of the ribbon where they were secured by the clothespins and then cut each ribbon 2 1/2 or 3 inches long. I cut at an angle, but if you are going to seal the ends it doesn't really matter how you cut them. You can play around with this, you may like them shorter or longer. It is all up to you. I seal each end with a lighter so they do not fray.
There you have it, a mound of Korkers! It is such fun!


Now I am ready for some Korker Bow Fun!

Happy Sewing!
Glo's Crafty Creations
Glo's Crafty Creations

Comments